I don’t know why I have never encountered this problem before but recently I tried to use my Traktor Audio 6 together with Ableton and had a fair share of problems. Basically I couldn’t route Ableton’s output to anything different then ‘Output 1&2’ which is the main output at the Audio 6’s front side. Everything else could be selected but just didn’t take effect (Ableton wasn’t even showing any kind of levels).
Same problem on the inputs: I have two turntables attached to the Audio 6 and wanted to use their inputs within a vst-plugin (MsPinky, as you may have guessed) but I just wasn’t able to get any signals coming into Ableton.
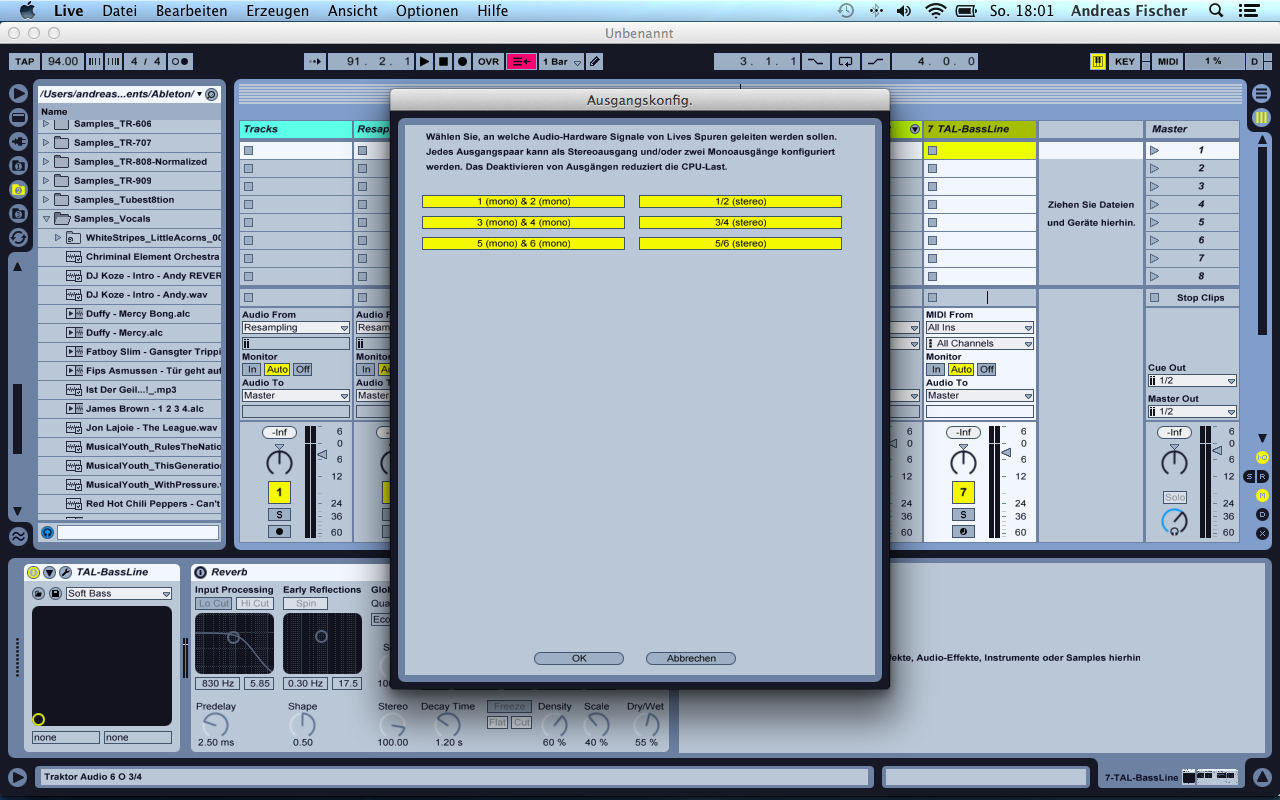
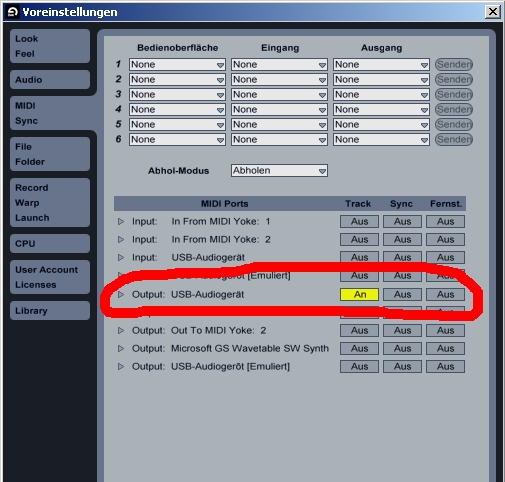
Of course the settings in Ableton all were correct. The screenshot only shows the output config but the input settings were accordingly.
I had a simple clip running on a track and changed the Master Out settings a few times. Whatever I tried it only sent out real music (into my mixing desk) when I selected channel ‘1/2’ for Master out. 3/4 and 5/6 just kept being numb.
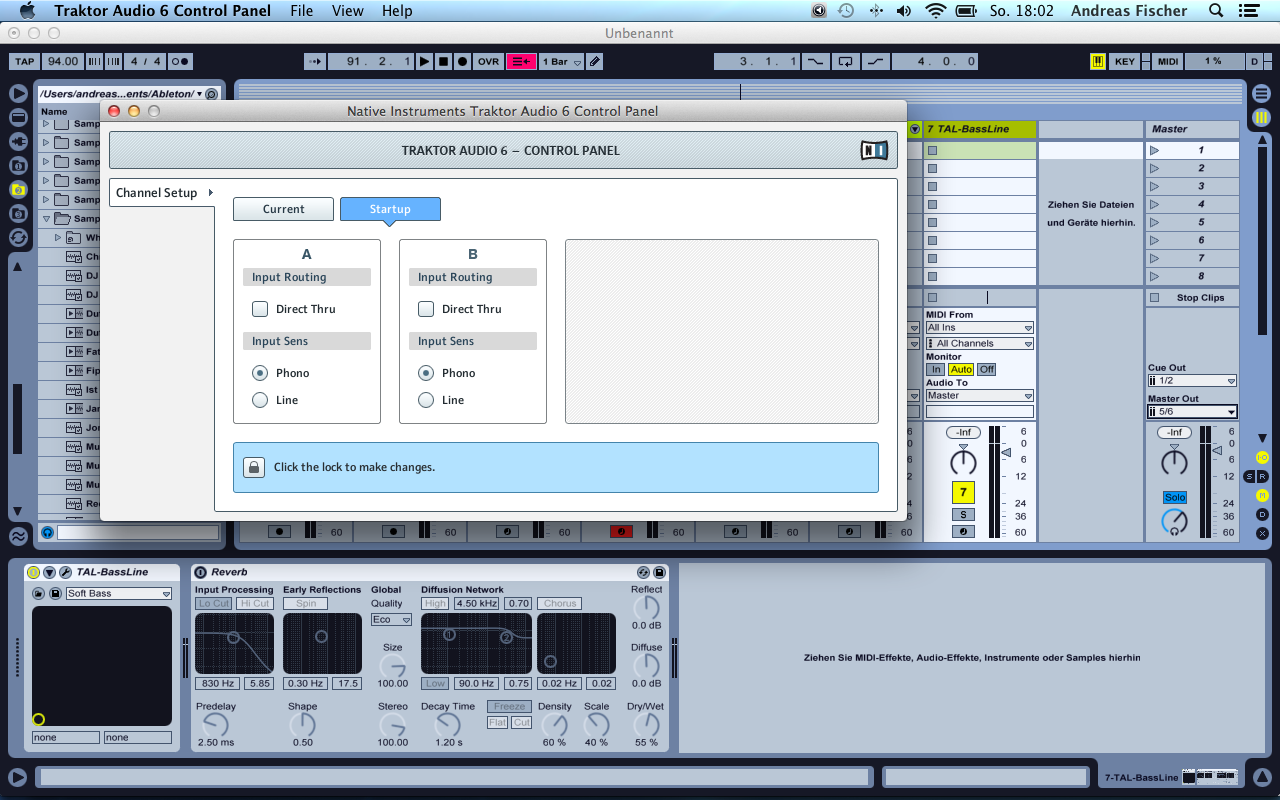
The problem behind all this is that the Audio device’s input settings for both channels 3/4 and 5/6 was set to ‘direct thru’. Meaning: Everything that is connected to the inputs is directly routed to the outputs. The device itself is not able to send audio data to these outputs in this case. Looking at it from a little distance it’s something I could have known before because every time I had Traktor Scratch running and attached the Audio 6 to my computer I was presented with a ‘direct thru’-configuration for both decks. I had to deactivate this every time I used it.
The solution is simple: Just open up the Audio 6 Control Panel and deactivate the checkbox for ‘direct thru’-mode. It’s probably a good idea to do this in the ‘startup’ tab since this changes the device’s configuration to behave like this automatically every time you connect it to your computer.
I don’t know if it’s necessary to do a reboot afterwards. While trying to find this solution I made so many of them I don’t know for sure.
Anyways: After making these steps I was able to select every possible input and output combination for my Audio 6 in Ableton – and all of them worked like a charm.
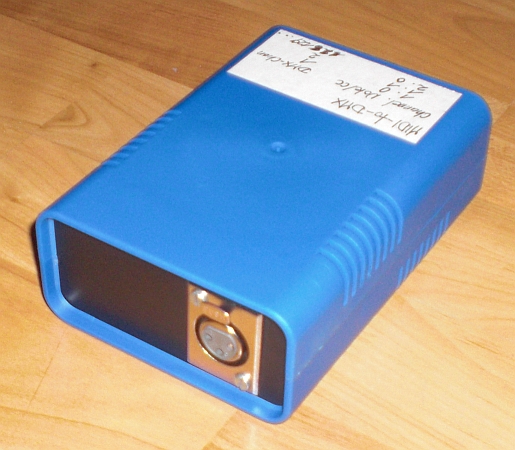
As you already might have guessed this is a simple MIDI to DMX transceiver. It’s powered via USB and doesn’t need any additional drivers. On a German Windows XP it installs itself as an ‘USB Audiogerät’.
The aim of it is to have some practical solution to control lights with Ableton (any midi sequencer). In Germany we say “AEG: Auspacken, einschalten, geht” (which is a pun based on a german company’s name and means something like “unpack, switch on, enjoy”.)
There are, of course, other ways to control your lights via a midi sequencer. You could, for example, have a dedicated midi track in ableton to send out midi to your GrandMA onPC (any lighting software). This would give you the power of your lighting desk combined with the power of your midi sequencer.
On the other hand side this might be a little bit of overkill if you just want to drive some LED pars (or it might even be impossible if you never worked with a lighting software before). Furthermore you are always using your lighting software ‘blindsided’. you can just hope your midi clip triggers the correct chaser. I know from my experience that it really takes a lot of preparation to make sure every midi clip only triggers your desired lights. Many things can (and will) go wrong. Therefore it’s easy (and fun – somehow) to quickly edit your midi clip on your light-track (or group of tracks) and instantly see the changes you made. Don’t forget: If you are using midi clips you are automatically in sync with your sequencer. No need to send an extra clock signal etc.
However, you could also think about controlling your existing hardware lighting console via true DMX. Might lead to some interesting combinations if you are having a gig in a venue with a fixed lighting structure and a lightjockey who will give you control over his desk (as if that ever happened……).
Sadomex can send out DMX-signals based on incoming midi-notes or midi-CCs. The mode can be changed during usage. The communication works one way. It’s midi IN and DMX OUT.
512 DMX channels are supported. This is achieved by using different midi channels. Midi Notes/CCs 0-127 on channel 1 represent DMX channels 1-128. Midi Note/CC 0 (the first one….however you may count) on midi channel 2 represents DMX channel 129 and so on….
Naturally, the resolution is only half as precise as native DMX since midi only supports a range of 128 values and DMX supports 256. There could be different workarounds but that would only make it more complicated. This way, a midi note’s velocity of 127 (full) represents a DMX channel’s value if 255.
This video shows the device in action with an LED Par lamp. Notice how the lights stay in sync with the metronome:
This is how you configure Ableton to talk to Sadomex. In this scenario the first 128 DMX channels can be addressed due to the output channel being set to 1. If you would like to control a fixture with a start-address greater than 128 (and smaller than 256) you would set the output channel to 2. Realize Ableton’s possibilities to group tracks. This way vou could control a whole bunch of fixtures as if they were midi clips. The clips in the screenshot, by the way, are those from the video above.
A demo file for Ableton 8.2 can be downloaded here . It shows some basic patterns for controlling an RGB LED Par at DMX address 10.
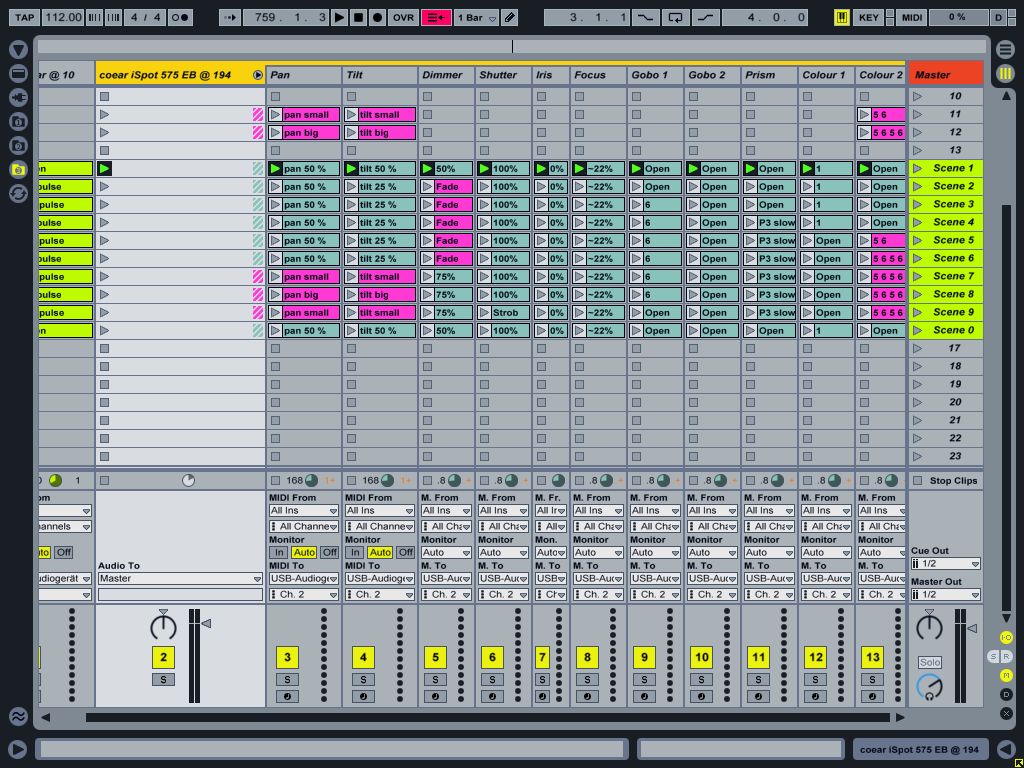
I put together another example which is a little more complex. This one controls a Coemar iSpot 575 EB with a base address of 194. Notice how the output midi-channel of the iSpot’s tracks is set two ‘2’ in order to reach DMX-address 194. The pinkish coloured clips are chasers (e.g. continuously change colourwheel 2 between colour 5 and 6) whereas the blueish-green ones represent static values (gobowheel 1 set to ‘open’).
This is all done with Sadomex being in ‘Note’ mode (reacting to Midi notes and their respective velocity values…).In my eyes, Ableton’s workflow is not quite optimized for easily creating CC curves for this special scenario. Maybe it’s easy to achieve in-sync CC curves/values with other sequencers.
It surely IS a pain in the back to put together pan/tilt motion with midi notes. Furthermore you are really bound to a certain tempo when it comes to pan / tilt motion (a smooth tilt wave at 112 bpm like shown in the example won’t look as smooth at 65 bpm without being altered to a high degree). On the other hand side it’s fun thinking about what you might be able to do with things like Ableton’s built in Midi Effects like Velocity, etc….
This time it’s being controlled via Akai’s APC20 which makes it even more fun.
Due to my 1337 computer skillz (not) it was absolutely impossible for me to convert my video -with- audio. If you look carefully you see the LED Par from the previous example in the bottom of the movie. It’s flashing in sync. At least you can get an idea of what it’s all about:
I’m not quite sure how to proceed with this right now. At the moment (october 2010) all my resources are tied to other things. Maybe I’m going to build a few ones when there is time and sell or swap them. Contact me if you are interested in a unit or if you have any questions regarding the device.
[Update 31.10.2010]
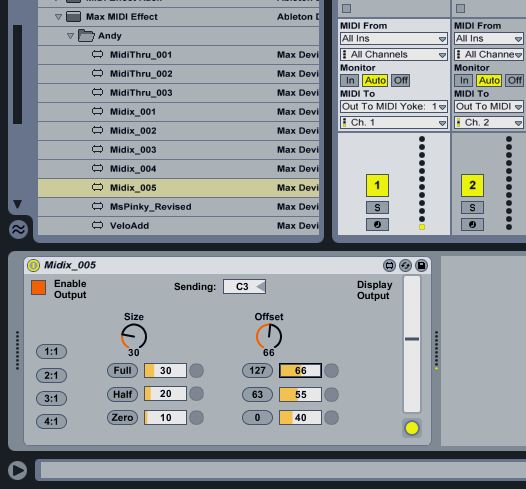
Oh Ableton how much I adore love like you! After playing with the above setup for a time I was not really confident with Ableton’s native possibilities for live-editing the Midi (i.e. DMX) output. For example: It’s a quite common task to make a moving head point to a certain position and make it do its motion arround this position then. This can basically all be done by simple note-to-dmx conversion but it’s not as dynamically assignable and easy to do like you would with your dedicated lighting-controller (I guess you know I’m talking ’bout GrandMA…….). That’s why I had a look at Max 4 Live. Fortunately I have been tinkering with PureData before so the start was not that complicated for me. What came out is a nice little MAX midi effect doing all the necessary processing within one device:
(I later realized that what I built is nothing more than an ordinary MIDI-lfo.) What the effect does is that it creates a sine-envelope for the velocity values of the incoming notes (those notes which are played in the active clip). Since everything is midi-assignable the amplitude of the sine (= the size of the effect) and the offset (= the position the head is moving around) can either be selected from fixed and user-configurable presets or they can directly be controlled by a knob or a fader (assigned to the dials in the screenshot). The sine’s periodicity (=fixed multiples of the motion’s velocity) can be selected from four presets as well.
(Yes…you surely Do have to look a little bit careful to locate the mouse and its actions in the lower left corner of Ableton…)
See how the Pan/ Tilt positions can be selected by triggering one of the presets or how they can be controlled by the dial.
The output still looks a little …not perfect but I don’t care. It does the job quite well. One of the biggest advantages: It doesn’t send a ‘Note OFF’ when live’s transport is stopped. That leads to the fact that the last position is stored and the moving head does NOT reset to it’s ‘zero-position’. Good thing just in case you are in the middle of a show and need to stop live’s transport. Sure it’s a good idea to have those kind of effect on the dimmer channels too because that way lights will stay on even if you stop.
You can, as well, apply the Max4Live device (which doesn’t have an interesting name yet) to other channels. The colour wheel, for instance. The result is the same: You can select colours from one of the presets or apply a colour chaser or controll the position of the colour-wheel in realtime via the midi-assignable dial.
Der große Sohn spielt mit den Nachbarskindern im Beet vor unserem Haus (im Garten? Auf dem Klettergerüst? Niemals). "Papa, können wir Hammer und Nägel haben? Wir wollen ein Iglu bauen - aus Farbe!"Man muss dieses Kind einfach liebhaben
Der Vierjährige hat einen beängstigend großen Wortschatz. Er verwendet den Konjunktiv und nimmt selbstständig die Position seines Gegenüber ein, um Dinge zu verargumentieren. Er zählt größtenteils selbstständig von -10 bis +100. Es ist erstaunlich. Gleichzeitig verwechselt er konsequent die Wörter für 'Mama' und 'Papa'. Das beruhigt einen dann doch.