Some time ago I bought Korg’s PadKontrol. The device is a sweet little Midi Controller with very sensitive touchpads. One of the better things about it is that the pads are lit when pushed. We used both Korg PadKontrol and the Akai MPD24 for making music with Ableton Live and the Korg just felt better because the Pads were way more sensible and the optical feedback just gives you that important kind of extra confidence that says: “Button hit, bro”.
The downside of the controller is the original programming of the firmware. you can -of course- send all the common Midi-stuff (Notes, CCs). But the padlights are just crap. You can configure the pads to be in ‘Flash’ or ‘Toggle’-mode but in either way the light will only flash for a fracture of a second and that’s it. Just imagine a live situation where you configured some pads as toggled and others as flashed. Even if a pad is set to ‘on’ you won’t be able to recognize that. Second best (worst?) thing is that the majority of the buttons besides the 16 main pads can only be used for configuring the device, including the JogWheel.
Fortunately the controller (and some of Korg’s other products) supports the so called ‘Native Mode’. In that mode the Controller only sends out SysEx Messages and you can do your own processing. Furthermore you have complete control over all the elements of the controller (Jogwheel, all buttons, all the lights, …)
There are already applications out there that automatically put the Controller into Native Mode and take care about the processing of the SysEx messages but I didn’t find any of them to be easy to use or userfriendly (or Windows-Capable). At the end I am planning to use thecontroller in a live environment and I don’t want to have to mess arround with Perl-scripts or Max-patches ‘n stuff.
That’s why I built my own Windows program to put the controller into Native Mode and do some SysEx-processing afterwards. At the moment the software sends hard-wired Midi-Notes on every pad as well as the JogWheel and the knobs. There might be other possible configurations but I found this one to be rather universal.
[Update 2.3.2010]
Due to recent contributions there is a huge amount of changes being implemented. These changes mostly regard the Midi-Data being put out. The changes are documented further below.
Explanation:
the pads send notevalues depending on the selected bank. This is easy. When the JogWheel is turned to the left it will send notes ‘E2’ for 3 miliseconds (note on … wait .. note off). That’s a value which proved to be okay. When the X-Button is pressed the JogWheel will send ‘F#2’ (turning left) and G2 (turning right) note impulses for 3 miliseconds. When Knob1 is turned to the left it will send out ‘G0’ notes for 3 miliseconds; when it reached its left end position it will send a G#0 note (guessed it: for 3 miliseconds). When the ‘Roll’ Button is pressed it will not only switch the internal bank but also send out an ‘E0’ note for 5 miliseconds; this might be useful for triggering bank changes in your software or whatever. At the moment the output midichannel is hardwired to 1. The touchpad isn’t used yet.
The first half of the video shows the normal operation mode of the PadKontrol. You will realize the difference in the pad’s behaviour after it is switched into Native Mode (the moment that the controller is put into Native Mode can be identified by the change of the diplayed information from “5.01” to “GMA”.). The pads (configured as ‘Flash’-pads by default) stay lit as long as you keep them pressed.
You can easily change the configuration of any pad’s behaviour. This video shows how to configure the pads to be in Toggle-Mode. Press the ‘Scene’-button. The display will change to ‘TGL’. All the pads that are now selected will be in ‘Toggle’-mode. All the pads that are deselected will be configured as ‘Flash’ again.
What you will also realize is that the applications supports multiple ( 3 ) banks that can be selected via the ‘Roll’-, ‘Flam’- and ‘Hold’-buttons. That makes up to 48 configurable pads. Every bank’s pads can be configured independently to FLASH-, TOGGLE- or CNx- Mode (explained below). When a bank is recalled its pad’s states (on / off meaning lit / unlit) will automatically be recovered. Switching banks will not change the controller’s output (of course).
You can enter the settings at any time to change a pad’s behaviour. It won’t interfere with the controller’s output.
The second mode that I implemented is called ‘Interconnect’. You enter it by pressing the ‘Message’ button. The display will change to ‘CN1’. You can now select those pads that will be linked to each other. Explanation: when configured in the ‘CN1’-mode only one pad will light up (and send midi -out…). Every other pad configured in that same mode will be deactivated (and send a note-off value, of course. This mode might be useful when controlling Ableton’s ‘Arm Track’ or for selecting the Track you want to cue on your headphone or … .
I implemented 3 ‘CN’-modes. (CN1, CN2, CN3). They can be reached via the ‘Message’-, ‘Fixed Velocity’- and ‘Prog Change’-buttons and are independent for all three banks.
[29.11.2010] I created a new video trying to explain all this a little bit more in detail:
The software is written in VB6 and all the Midi processing is based on the Midi-Ox ActiveX-plugin and the VB6-examples that can be found on the website. You need to install Midi-Ox in order to run the program. Furthermore it’s a good idea to have Korg’s USB drivers installed. Configure the program’s I/O like shown below to have Midi-Out via MidiYoke 1. From my experience the best way to do it is to set the I/O via Midi-Ox and give it a restart.Everything should be fine then.
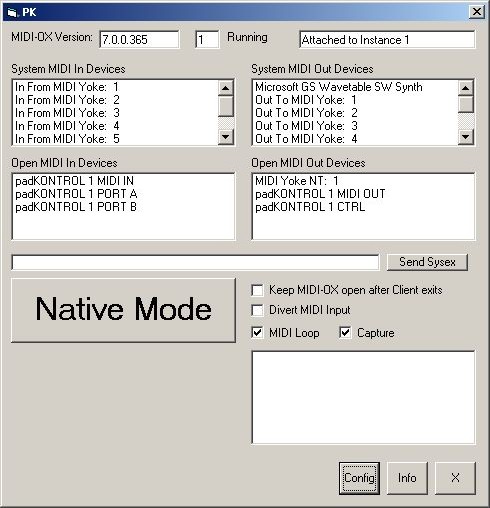
The output of the software is rather hard to explain. The best way is to monitor it via MidiOx’s output monitor. You can change the output data in a wide variety by accessing the config-dialog:
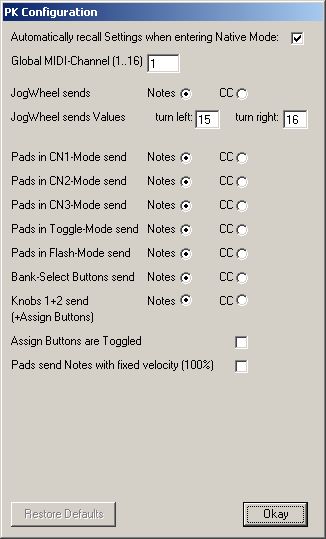
The settings should be rather self-explanatory (at least to me…feel free to send me an e-mail if you have any questions). All the settings are stored in the user’s branch of the registry (Windows XP) under HKEY_CURRENT_USER\Software\PadKontrol. In case you go for the tough-boy approach and manually want to alter anything there please keep in mind that the entries are case sensitive.
[Update 11.1.2011]
The program now supports MIDI feedback for the 16 pads. Inspired by User ‘Fedejair’ from the DJTechTools-Forum I updated the software so the 16 pads can be switched on and off via incoming MIDI-data being sent from Traktor or ableton or whatever software you want want to use.
In order to be able to do this you first have to add another MIDI-In-port in the configuration of my software. If, for example, you use my program to control Native Insturments’ Traktor then you’ll probably have ‘MidiYoke 1’ as the output going into Traktor. To enable MIDI feedback FROM Traktor add MidiYoke’s port number 2 as an input in my program and set Traktor to ouput MIDI data via midiyoke 2. Do NOT use MidiYoke 1 as an output towards Traktor AND as an input FROM Traktor. This will sure cause some nasty feedback behaviour.
If you’ve done this open the config-dialog and find the new button:
[…]
[Update 29.4.2011]
The feedback mode has undergone a major review and is now a lot easier to implement. Feedback mode can be configured for selected pads by accessing it via the ‘ProgChange’ Button of the PadKontrol (which makes it that the CN3-mode is gone). Just hit the button and keep it pressed. The dislay will change to ‘fdb’ which indicates that you are in the configuration for the feedback mode.
A pad which is configured for the feedback mode reacts on the incoming midi note it would send out. To explain this let’s have a look at the midi output sheet of the software:
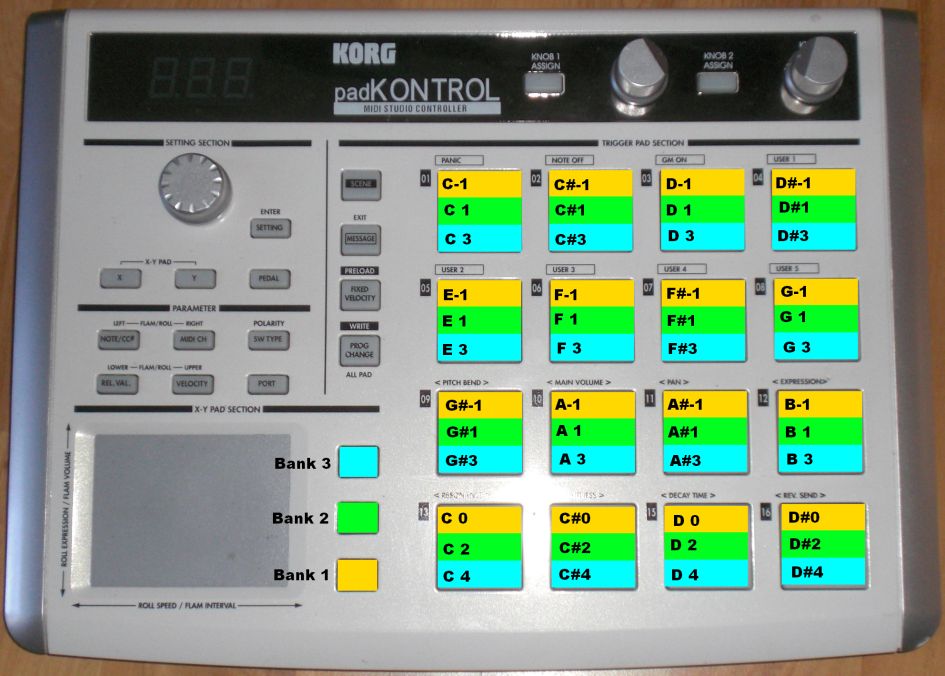
It is read like this:
If bank number 1 is active then pad number 1 (upper left) will send out a midi note ‘C-1’ (the first possible midi note). If this pad is configured for the feedback mode it will be lit when a ‘Note On C-1’ midi signal is received (velocity >= 63).
[Update 20.6.2012] I just discovered a little flaw in here. C-1 is a bit misleading since different tools show different values. Anyway, it’s the lowest possible Midi note that pad #1 is reacting to. That’s shown as C-1 in Midi-Ox but it’s shown as C-2 in Ableton. If you send a note for pad #1 as a feedback to the PadKontrol and pad #9 is lit you know that you (like me) were caught by the ‘octave-trap’.
A pad in feedback mode can only be used when it is activated (lit up). Otherwise it will not send out any midi data when you press it.
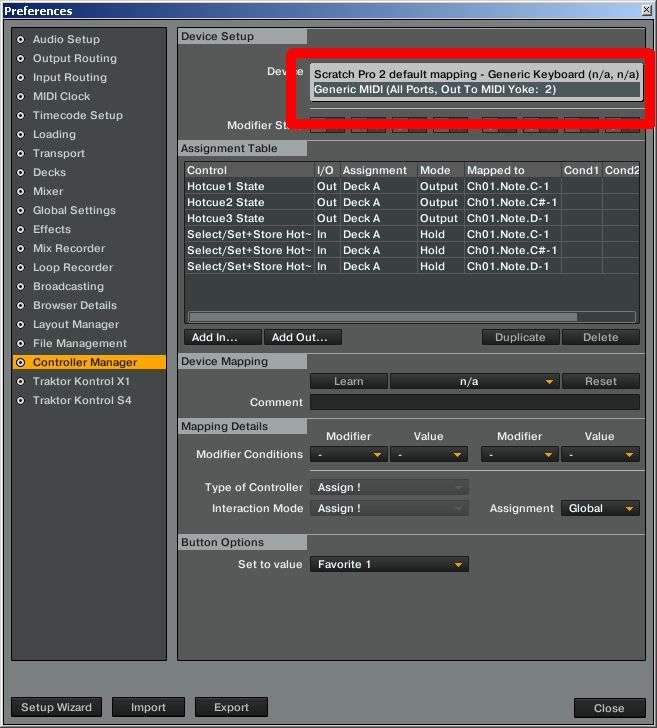
In order for the software to recognize incoming midi data you have to add a midi-in port to the configuration. This might look like this:
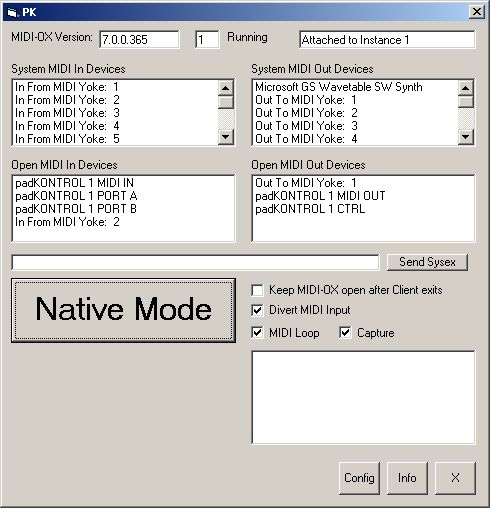
Have a look at the ‘Open MIDI In Devices’ listbox. The PadKontrol-Ports are used for communicating with the controller itself. ‘In from Midi Yoke 2’ means that if you have a software running on your computer, let’s say Traktor 2, which sends out midi data via MidiYoke 2 then these data are received by my software.
If you look at the ‘Open MIDI Out Devices’ listbox then you’ll probably guess that my software sends midi data through MidiYoke Port 1 out to the world. That’s the port that you should configure in your receiving software (i.e. Traktor) to listen to.
This example shows the demo version of Traktor 2 together with my software. Please pay some special attention to the fact that the first song to be played has 3 hotcues (3 pads are lit) and the second one only has 2 hotcues. The pads are dynamically reactivated and can be used accordingly.
What you cannot see in the video is that all three banks of pads are supported in feedback mode. Cool thing, I’d say =)
These two screenshots show the midi configuration of Traktor for deck A to send out and react to midi data. Of course you are not limited to Traktor at all but can use my tool with any kind of software being capable of midi in-/output.
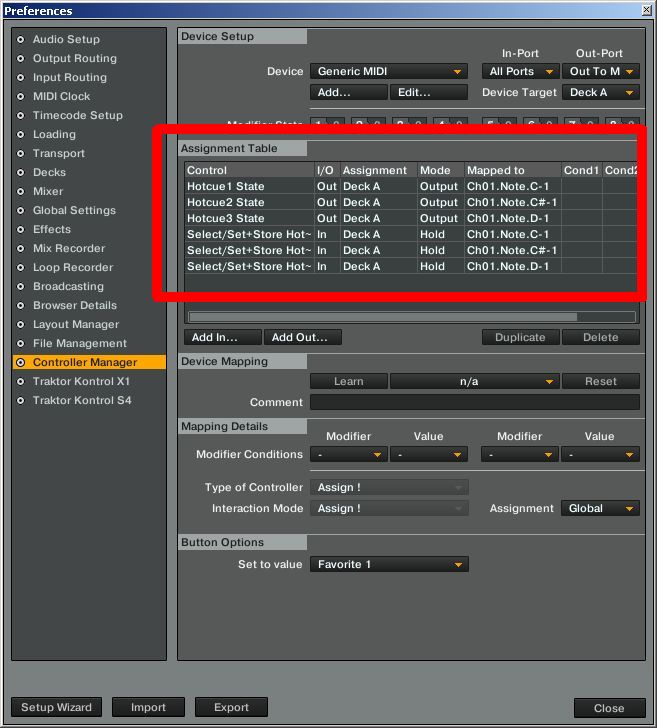
Traktor’s midi OUT port is set to MidiYoke2 ….
[18.6.2012]
Based on suggestions made by Jan from Belgium I added this option:
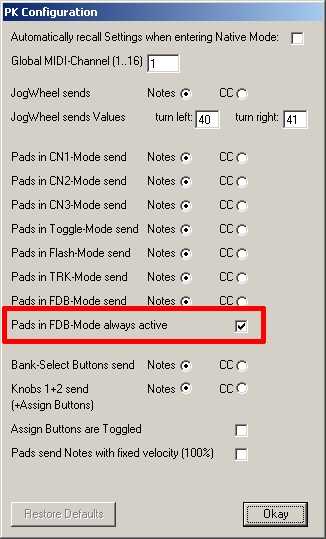
It means that pads which are configured in feedback-mode always send midi data even if they are not toggled by external midi feedback. Typical usecase could be a drumtrack which visualizes the beat of your kickdrum sample (i.e. pad is blinking with the beat). This mode being active you have the possibility to then add additional kicks by simply hitting the pad.
Furthermore there is another mode which must have been implemented quite some time ago but i totally forgot about it… TRK-Mode. You set it by pressing the “Settings/ Enter” button (lower right of the jogdial). Pads in TRK-mode are always lit. They behave like pads in FLASH-mode (TRK stands for …”tracking” or so…I don’t remember).
[1.7.2012]
When you change the banks (via ‘Roll’, ‘Flam’ or ‘Hold’ button) the bank-numer is now shown in the display for a short time. Furthermore the direction is shown in the display when you twist the jogwheel.
The PadKontrol’s XY-pad is now supported. You can either have it send out ordinary midi CC data (that’s CC126 and 127 for now) …
…OR….
You can use it as a tap button.
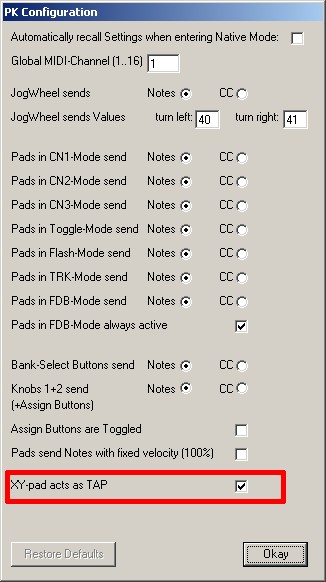
When this mode is active the pad will not send a continuous stream of midi CCs but only a single CC date (CC #125, value: 127) when it is hit. Due to the nature of the XY-pad this mode is not absolutely perfect but for a rough tap it’s quite cool to use.
The program can be downloaded here . I decided to give it a try and make it donationware. The program is fully functional. The only limitation is a nag-screen being shown at the program’s start.
If you want to get rid of it (or encourage me to implement new features) take your chance and have a look at my Amazon Wishlist or feel free to donate something via Paypal:

