As stated an multiple occasions, I am doing live visuals every now and then for various events. Most of my footage is based on shaders. In (very) short: These are programs that are executed on your graphics-card and create visuals in real-time instead of playing pre-made videos. Extremely interesting and extremely nerdy. You might want to check out https://glslsandbox.com/ to get an idea. However, trying to run shaders on, for example, a Raspberry Pi 4 instead of a top-tier Macbook pro has a huge amount of its very own quirks. Playing videos on an RPI4, however, doesn’t cause too many problems.
So I only need to create a video loop of my shaders and … done.
Well … no. The video below is a typical example of a shader that’s repeating- somewhere. The original video I created out of the shader is 15 seconds in duration. To make things really obvious I created a simple loop with FFmpeg.
ffmpeg -stream_loop 1 -i video.mov -c copy video-loop.movYou’ll recognize a noticeable cut at ~15 seconds. Obviously, this cannot be it.
However, using FFmpeg we have the possibility to analyze the difference between frames. That’s a win. First up we make sure that the original video only consists of keyframes:
ffmpeg -i video.mov -g 1 video_all_keyframes.movDepending on the original material (codec, compression settings, etc.) this might drastically increase the video’s filesize. However, it’s only temporary (kind of).
In order to find a (near) seamless loop we now proceed with the new keyframe-only video and compare every frame of the video with a completely black frame. Those frames with a similar difference have a high probability of being visually equal.
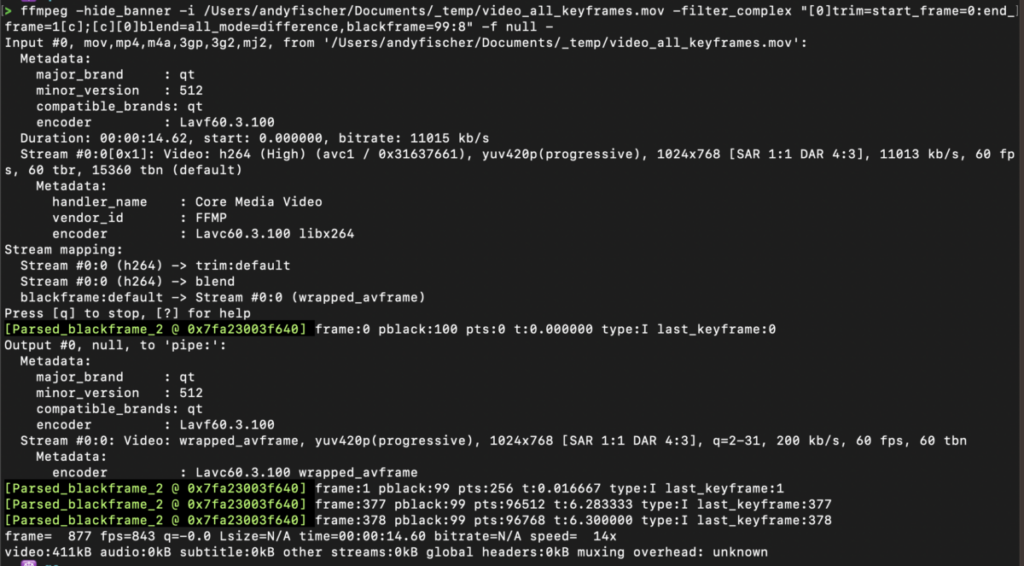
ffmpeg -i video_all_keyframes.mov -filter_complex "[0]trim=start_frame=0:end_frame=1[c];[c][0]blend=all_mode=difference,blackframe=99:8" -f null -(If you copypaste the snippet please pay extra respect to the trailing hyphen). The command’s output, run in a terminal, looks like this:

The interesting parts are the green lines starting with “[Parsed_blackframe …”. The command’s output lists those frames where a difference to a black frame is less than 8 for 99% of the pixels. All of them are potential candidates for a loop’s start- and endpoint. Depending on the video (again: codec, compression, etc) you can tweak those values and make the comparison even more or less precise.
For example:
… all_mode=difference,blackframe=75:50 ….
will list all frames where a difference to a black frame is less than 50 for 75% of the pixels. Obviously, the amount of potential frames for a loop will increase but the chance of creating a visually seamless loop will decrease accordingly.
Let’s try a loop between frame 1 (time: 0.016667) and frame 378 (time: 6.300000 seconds):
ffmpeg -i video_all_keyframes.mov -ss 0.016667 -to 6.300000 potential_loop.movThe resulting video has a duration of 6 seconds. Let’s loop it 3 times and check if we have a seamless experience:
ffmpeg -stream_loop 3 -i potential_loop.mov -c copy loop.movThe interesting timestamps are (you guessed it) at 6, 12 and 18 seconds. I think it’s looking very good

