Due to … massive … request I took the chance and did a major overhaul of my post about the GrandMA remote command line from a few years ago. Back in the days I pulled together a quick ‘n dirty version which somehow worked and caught some interest but never really became more than a proof of concept.
tl;dr: This program provides a remote command line to a GrandMA Version 1 lighting desk (console or onPC). Since it’s implemented in Java you can basically run it from every computer that you have at hand ( yes: even a Raspberry PI ). Having a command line proved to be quite handy especially when you are setting up a show from scratch. It is simply faster to issue the command “fader 1.1 thru 5.10 at 0” than to manually set 90 faders to zero (or -god forbid- use a mouse to do this on the onPC-version without a touchscreen).
I’m a little late on that topic: Meanwhile ( meaning: a few years ago ) the GrandMA Version 2 has been released and it incorporates a native Telnet interface. This somehow makes my version obsolete but … people asked for it and I owe it to myself, I think.
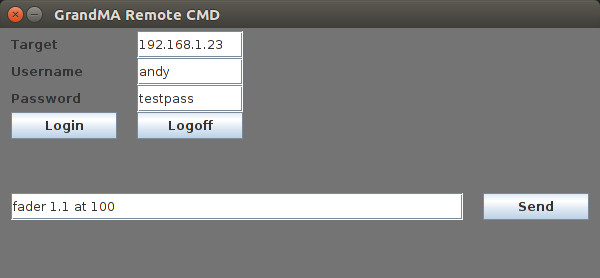
This was initially planned to be the first ‘official’ release to benefit from the GUI-Template which I am working on for quite some time now but I realized that it carries way too much overhead for a simple Demonstration like this. That’s why I quickly put together a rather minimalistic version which only incorporates the basic features. You can easily expand from here. ( Don’t worry: I’ll post a VERY thorough documentation of my GUI-template soon =). )
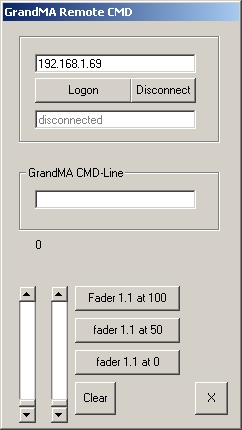
Let’s first take another look at the old version. It connects to a GrandMA console relying on a hardcoded username (‘andy’) and an empty password. Back then I didn’t have the time, need and energy to care about how these things are implemented.
In addition to the pure commandline a small set of functions (2 faders, some buttons) is implemented.
It only works on Windows. This is a limitation which makes it somehow senseless to have a remote command line. Because…. well … I might call it common sense.
Reading the old post and looking at the old source-code I realised that there were some imprecise statements. Some would say that the main parts were just plain wrong so it’s reasonable enough to do fix this within a new post.
Here is a quick recap of the original idea: The GrandMA lighting desk provides a local command-line Interface which basically gives you access to everything you would otherwise achieve via a combination of mouseklicks. There’s also the possibility to run multiple consoles within a network and you could use another console’s interface to remotely access a command line. In addition there was a software for the PocketPC-platform which -among other things- allowed access to the console’s command-line via network. There’s probably also some IOS-Version floating around but it seems to be outdated.
To make things a little more weird complex there even was a PocketPC-emulator. This means instead of simply running an instance of GrandMA onPC on your Windows-computer and connecting this to another GrandMA console you could start an emulated version of the PocketPC-software which not only had a reduced set of buttons but also successfully emulated the actual screen size of the PocketPC’s display. Trust me: THAT thing is a true PITA to use. As I mentioned in the original post there a some things I will probably never understand.
But who am I to complain: Using the PocketPC emulator on a Windows-PC to remotely access the command-line on another PC and analysing the data with Wireshark sets the base for my implementation of a remote command-line.
Here we go: Situated on the left is my terribly outdated and faulty laptop which I revived because it still had an installation of the PocketPC emulator. Realise how the emulator perfectly ( and senselessly ) maps the original screen size of the PocketPC. An instance of Wireshark is also running in the background. The centre Screen shows is my Linux-desktop running eclipse and the implementation of the remote CMD. On the right is my girlfriend’s laptop running the latest version of GrandMA onPC version 1 (she doesn’t know it but she always has the latest version on her Laptop – god knows how).

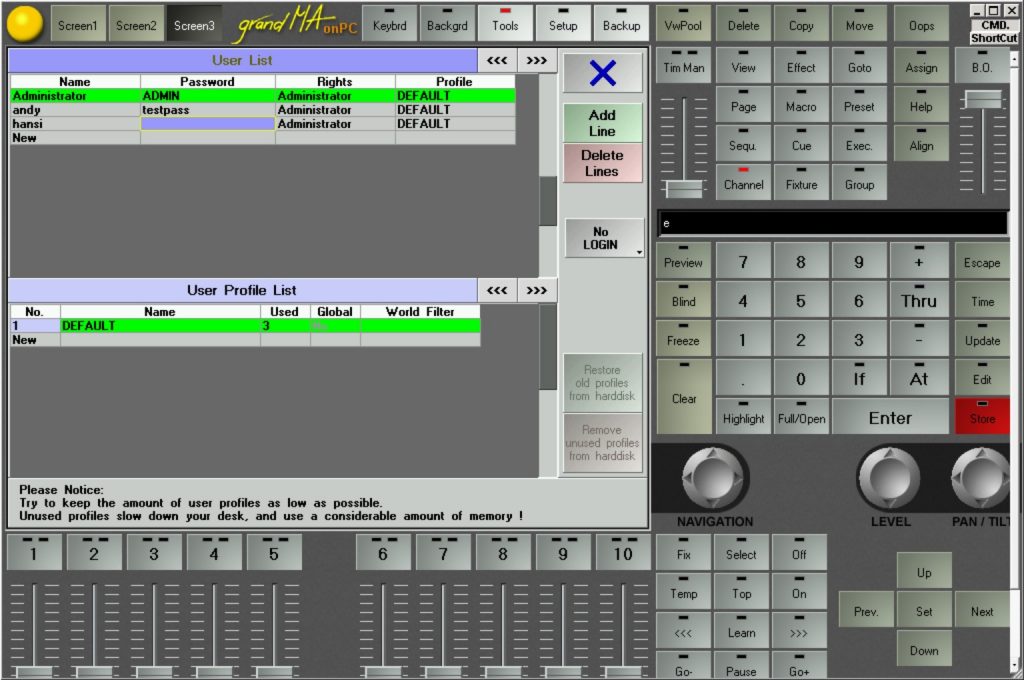
In order to be able to remotely use a commandline we first need to configure a user-account on the target console. This is done via “Tools | Setup User & Profiles”. I didn’t manage to successfully login from remote using the built-in Administrator-account yet. Either way it’s always a good idea to have dedicated accounts for these kind of things. (And for those of you unfamiliar with this topic: yes, once logged in, everybody can see the plaintext passwords of other users. You surely wouldn’t to this nowadays but that’s not an issue in this scenario. )
To implement our own remote command line we need to make three TCP connections to the console on port 7001, 7002 and 7003:
The first steps consist of opening a TCP Connection to port 7003 und 7001 of the remote console. An initial handshake-signature is sent to port 7003. This signature seems to differ everytime but I am using a constant signature for a few years now and until now there were no signs of this being a problem.
Byte[]{0xDC, 0x05, 0x00, 0x00}
The next step is sending the username (and a password, if necessary) to the console. Therefore a single packet is sent to the console to port 7001 containing only 4 Bytes of data:
Byte[]{LENGTHOFUSERNAME, 0x00, 0x00, 0x00}.
The actual username is directly sent afterwards within one single TCP-packet. Keep an eye on sending a username of the correct length as specified in the packet before. If you mess this up you can instantly crash the console via remote (tested with GrandMA onPC v6.808). If you REALLY want to mess with other people’s setup … this is a good place to activate your 1337 3V!L H4XX0|2 M0|)3.
To complete the sending of the username the code for <Enter> has to be sent. That’s another 4-byte TCP-packet:
Byte[]{0x01, 0x00, 0x0D, 0x00}.
It is now necessary to connect to port 7002 at the remote console. This port is used to transmit graphics-data: a blinking cursor, for example. It is not necessary to send any data via this connection, just the connection itself is needed in order for the login to proceed. A few more details on this can be found in the original article.
If you need to send a password then this is done now. All the characters of the password are sent seperately within another stack of 4-byte TCP-packets. The structure of each packet is as follows:
Byte[]{0x01, 0x01, PWDCHAR, 0x00}.
If. for example, your Password is “XXXXXX” then you will probably send six consecutive packets with data “0x01, 0x01, 0x58, 0x00” to the console to port 7001 (0x58 is the corresponding HEX-value for ‘X’ based on the ASCII table). Sending the password has to be finished with another remote <Enter>:
Byte[]{0x01, 0x00, 0x0D, 0x00}.
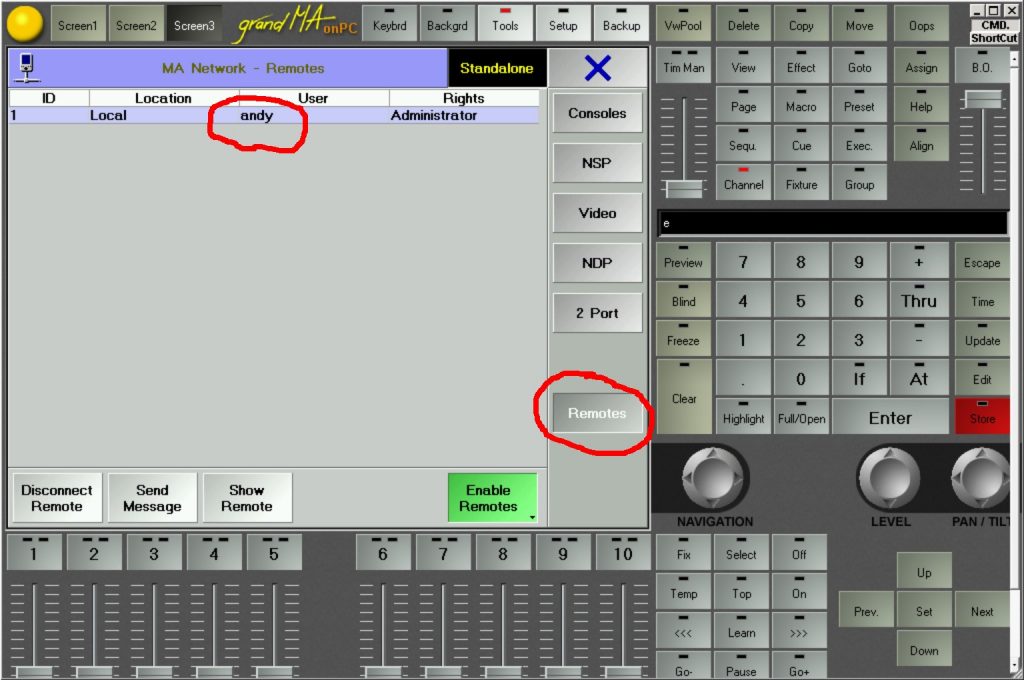
And that’s basically all there is to it. Your login should now be complete. You can test this in two ways: You can send a simple command like “fader 1.1 at 100”. This will move the first fader of the first faderpage to 100 (full on). You can also check within the network-settings of the remote console if the user is logged in. That’s “Tools | MA Network Configuration | Remotes”:
Here’s the complete code for the application. Core elements of it are quite thoroughly commented, I think. If you are facing trouble using the code feel free to contact me and I will send you a compiled version of the program. If you are using these pieces of information within your own application please let me know – just because I’m curious and it would be a nice gesture.
package Application;

import java.awt.Color;
import java.awt.Container;
import java.awt.GridBagConstraints;
import java.awt.GridBagLayout;
import java.awt.Insets;
import java.awt.event.ActionEvent;
import java.awt.event.ActionListener;
import java.io.DataInputStream;
import java.io.DataOutputStream;
import java.net.Socket;

import javax.swing.JButton;
import javax.swing.JFrame;
import javax.swing.JLabel;
import javax.swing.JTextField;


/**
 * GrandMA Version 1 remote command line interface.
 * This is an example of how to implement a remote command line interface for GrandMA version 1 Lighting desks.
 *
 *
 * There's probably enough room left for future improvement.
 * Feel free to contact me if anything is left unclear.
 *
 * @author Andy Fischer; info@doktor-andy.de
 *
 */
public class Application {

 static JFrame frmMain;
 static JLabel lblTarget;
 static JLabel lblUsername;
 static JLabel lblPassword;
 static JTextField txtTarget;
 static JTextField txtUsername;
 static JTextField txtPassword;
 static JTextField txtCMD;
 static JButton btnLogin;
 static JButton btnLogoff;
 static JButton btnSend;

 static Socket sckHandshake = null; //Port 7003
 static DataOutputStream osHandshake = null;
 static DataInputStream isHandshake = null;

 static Socket sckCommand = null; //Port 7001
 static DataOutputStream osCommand = null;
 static DataInputStream isCommand = null;

 static Socket sckGFX = null; //Port 7002

 private static final byte[] CMD_HANDSHAKE = new byte[]{(byte)0xDC, 0x05,0x00,0x00};
 private static final byte[] CMD_ENTER = new byte[]{0x01, 0x00, 0x0d, 0x00};

 public static void main(String[] args){
  initGUI();
  initLabels();
  initTextFields();
  initButtons();
  initListeners();
  placeElements();

  frmMain.setVisible( true );
 }


 private static void initGUI(){
  frmMain = new JFrame("GrandMA Remote CMD");
  frmMain.setSize(600, 250);
  frmMain.setLocationRelativeTo( null );
  frmMain.setResizable( false );
  frmMain.setDefaultCloseOperation(JFrame.EXIT_ON_CLOSE);
  frmMain.setLayout( new GridBagLayout() );
  initRaster_10x8(frmMain, false);
 }

 private static void initLabels(){
  lblTarget = new JLabel("Target");
  lblTarget.setPreferredSize(lblTarget.getSize()); //This stops the element from automatically resizing because of its inner text.

  lblUsername = new JLabel("Username");
  lblUsername.setPreferredSize(lblUsername.getSize());

  lblPassword = new JLabel("Password");
  lblPassword.setPreferredSize(lblPassword.getSize());
 }

 private static void initTextFields(){
  txtTarget = new JTextField();
  txtTarget.setPreferredSize(txtTarget.getSize());
  txtTarget.setText("192.168.1.23");

  txtUsername = new JTextField();
  txtUsername.setPreferredSize(txtUsername.getSize());
  txtUsername.setText("andy");

  txtPassword = new JTextField();
  txtPassword.setPreferredSize(txtPassword.getSize());

  txtCMD = new JTextField();
  txtCMD.setPreferredSize(txtCMD.getSize());
  txtCMD.setText("fader 1.1 at 100");
 }

 private static void initButtons(){
  btnLogin = new JButton("Login");
  btnLogin.setPreferredSize(btnLogin.getSize());

  btnLogoff = new JButton("Logoff");
  btnLogoff.setPreferredSize(btnLogoff.getSize());

  btnSend = new JButton("Send");
  btnSend.setPreferredSize(btnSend.getSize());
 }

 private static void initListeners(){

  btnLogin.addActionListener(new ActionListener() {
   public void actionPerformed(ActionEvent e) {
    logon(txtTarget.getText(), txtUsername.getText(), txtPassword.getText());
   }
  });

  btnLogoff.addActionListener(new ActionListener() {
   public void actionPerformed(ActionEvent e) {
    logoff();
   }
  });

  btnSend.addActionListener(new ActionListener() {
   public void actionPerformed(ActionEvent e) {
    sendCommand( txtCMD.getText() );
   }
  });
 }

 /**
  *
  * @param pTargetAddress
  * @param pUsername
  * @param pPassword
  * @return
  */
 private static boolean logon(String pTargetAddress, String pUsername, String pPassword) {
  // https://www.javaworld.com/article/2077322/core-java/core-java-sockets-programming-in-java-a-tutorial.html
  boolean bReturn = false;
  try {
   sckHandshake = new Socket(pTargetAddress, 7003);
   osHandshake = new DataOutputStream(sckHandshake.getOutputStream());
   isHandshake = new DataInputStream(sckHandshake.getInputStream());

   sckCommand = new Socket(pTargetAddress, 7001);
   osCommand = new DataOutputStream(sckCommand.getOutputStream());
   isCommand = new DataInputStream(sckCommand.getInputStream());

   if (sckHandshake != null && osHandshake != null && isHandshake != null) {

    //----A handshake is sent. I am not quite sure if it's okay to send ~something~.
    //----Looking at my wireshark-log the handshake is different every time.
    //----However, this is working stable for a few years on different computers now so I am
    //----pretty confident.
    osHandshake.write(CMD_HANDSHAKE);

    //----Creating a byte-Array containing the chars of the uername
    byte[] byUsername = new byte[pUsername.length()];
    for (int i = 0; i < pUsername.length(); i++) {
     char c = pUsername.charAt(i);
     System.out.println("HEX:" + String.format("%04x", (int) c));
     byUsername[i] = (byte) c;
    }

    //----First we send a packet with 4 bytes of data containing the length of the username which will
    //----then be sent next. If you mess this up you can instantly crash(!) the console
    //----via remote. Tested with onPC v6.808.
    osCommand.write(new byte[] { (byte) pUsername.length(), 0x00, 0x00, 0x00 });

    //----Sending the byte-array constructed we from the username
    osCommand.write(byUsername);

    //----Sending the ENTER-string
    osCommand.write(CMD_ENTER);

    //----Now a connection to port 7002 has to be made. Nothing to send- just the connection
    //----Otherwise the login will hang. One thing his connection transmits is the blinking cursor from the console.
    sckGFX = new Socket(pTargetAddress, 7002);

    //---We are sending the chars of the password. Every character is encapsulated into
    //---a single network packet containing 4 bytes of data: 0x01, 0x01, %CHAR%, 0x00
    for (int i = 0; i < pPassword.length(); i++) {
     char c = pPassword.charAt(i);
     osCommand.write(new byte[] { 0x01, 0x01, (byte) c, 0x00 });
    }

    //----Sending ENTER
    osCommand.write(CMD_ENTER);


    //---This is not reliable. It only shows that the logon()-method finished successfully.
    //---There could be issues on the GrandMA-side of the connection leading to you not being logged in.
    //---However, you are probably logged in by now and have at least some basic example where you can
    //---continue from.
    bReturn = true;
    System.out.println("logon(): Connected");
   }
  } catch (Exception e) {
   System.out.println("logon() Exception:" + e.getMessage());
  }
  return bReturn;
 }

 /**
  * Close everything
  */
 private static void logoff(){
  try{
   osHandshake.close();
   isHandshake.close();
   sckHandshake.close();

   osCommand.close();
   isCommand.close();
   sckCommand.close();

   sckGFX.close();
  }catch(Exception e){
   System.out.println("logoff() Exception:" + e.getMessage());
  }
 }

 /**
  * Sending the command to the remote console.
  * Every character is encapsulated into a packet with a length of 4 bytes of data.
  * @param pCommand
  */
 private static void sendCommand( String pCommand ){
  try{
   for(int j=0; j<pCommand.length(); j++){
    char c = pCommand.charAt(j);
    //System.out.println("HEX:" + String.format("%04x", (int)c) );
    osCommand.write(new byte[]{0x01, 0x01, (byte)c, 0x00});
   }
   osCommand.write( CMD_ENTER );
  }catch(Exception e){
   System.out.println("sendCommand() Exception:" + e.getMessage());
  }
 }

 private static void placeElements(){
  GridBagConstraints gbc = new GridBagConstraints();

  gbc.ipady = 0;      //make this component tall
  gbc.fill = GridBagConstraints.BOTH;
  gbc.insets = new Insets(0, 10, 0, 10);
  gbc.gridwidth = 2; gbc.gridheight = 1;

  gbc.gridx = 0; gbc.gridy = 0;
  frmMain.add(lblTarget, gbc);

  gbc.gridx = 2; gbc.gridy = 0;
  frmMain.add(txtTarget, gbc);

  gbc.gridx = 0; gbc.gridy = 1;
  frmMain.add(lblUsername, gbc);

  gbc.gridx = 2; gbc.gridy = 1;
  frmMain.add(txtUsername, gbc);

  gbc.gridx = 0; gbc.gridy = 2;
  frmMain.add(lblPassword, gbc);

  gbc.gridx = 2; gbc.gridy = 2;
  frmMain.add(txtPassword, gbc);

  gbc.gridx = 0; gbc.gridy = 3;
  frmMain.add(btnLogin, gbc);

  gbc.gridx = 2; gbc.gridy = 3;
  frmMain.add(btnLogoff, gbc);

  gbc.gridwidth = 8;
  gbc.gridx = 0; gbc.gridy = 6;
  frmMain.add(txtCMD, gbc);

  gbc.gridwidth = 2;
  gbc.gridx = 8; gbc.gridy = 6;
  frmMain.add(btnSend, gbc);
 }

 /**
  * This is probably looking weird but I figured out this creates a sophisticating solution to
  * manually adding elements to a container. Even if you only add parts of the elements everything
  * looks like it's supposed to. Furthermore you still have the benefits of a GridbagLayout.
  * @param pContainer
  * @param pRasterVisible
  */
 private static void initRaster_10x8(Container pContainer, boolean pRasterVisible){

  JLabel[] lblBlanko = new JLabel[18];
  for(int i=0; i<lblBlanko.length; i++){
   lblBlanko[i] = new JLabel("");
   lblBlanko[i].setBackground( Color.GREEN );
   lblBlanko[i].setOpaque( pRasterVisible );
   lblBlanko[i].setPreferredSize(lblBlanko[i].getSize());
  }

  //Die BlankoLabels platzieren
  GridBagConstraints gbcBlanko = new GridBagConstraints();
  gbcBlanko.insets = new Insets(01, 01, 01, 01);
  gbcBlanko.weightx = 1.0;
  gbcBlanko.weighty = 1.0;

  //----Horizontal
  for(int i=0; i<10; i++){
   gbcBlanko.gridy=0;
   gbcBlanko.gridx=i;
   gbcBlanko.fill = GridBagConstraints.BOTH;
   pContainer.add(lblBlanko[i], gbcBlanko);
  }

  //----Vertikal
  for(int i=1; i<9; i++){
   gbcBlanko.gridx=0;
   gbcBlanko.gridy=i;
   pContainer.add(lblBlanko[i+9], gbcBlanko);
  }
 }
}//Class

